Last Updated on October 4, 2026 by Ian
Creating a newsletter in Google Docs is a straightforward process. Creating a newsletter from scratch, however, may be challenging for someone without experience in the art of design; in such circumstances, they can use a newsletter template in Google Docs to create one for themselves.
Here’s a step-by-step guide to help you design and format a professional-looking newsletter:
Step 1: Open Google Docs
Go to Google Docs.
Click on the “+ Blank” to start a new document.
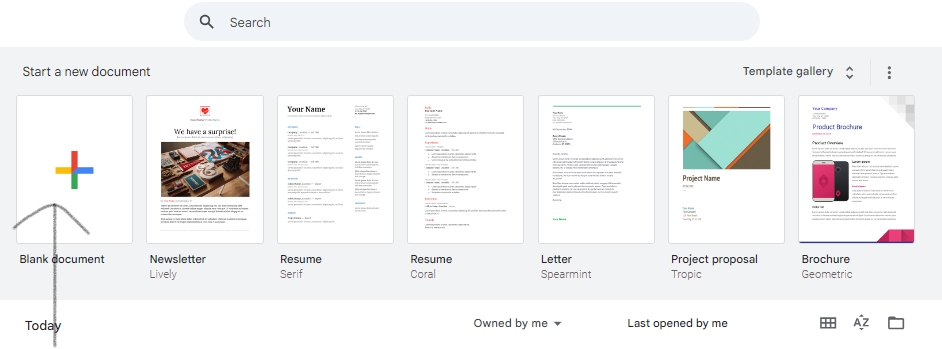
Step 2: Choose a Template (Optional)
Click on “Template Gallery” at the top of the Google Docs homepage.
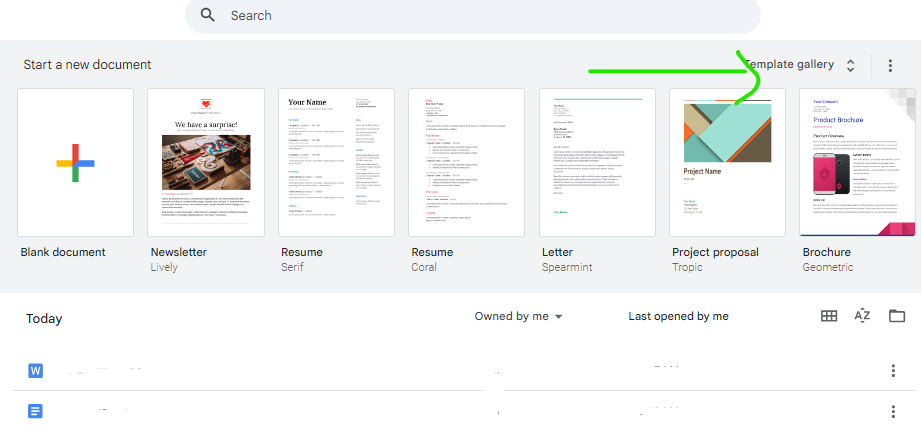
Browse the available templates and select a newsletter template. This can give you a head start with design and layout. Create a new copy of your favorite template by clicking on it.
Now you should have a new document with your selected newsletter template.
if you prefer to start from scratch, skip this step.
Step 3: Set Up Your Document
Page Setup:
Go to File > Page setup.
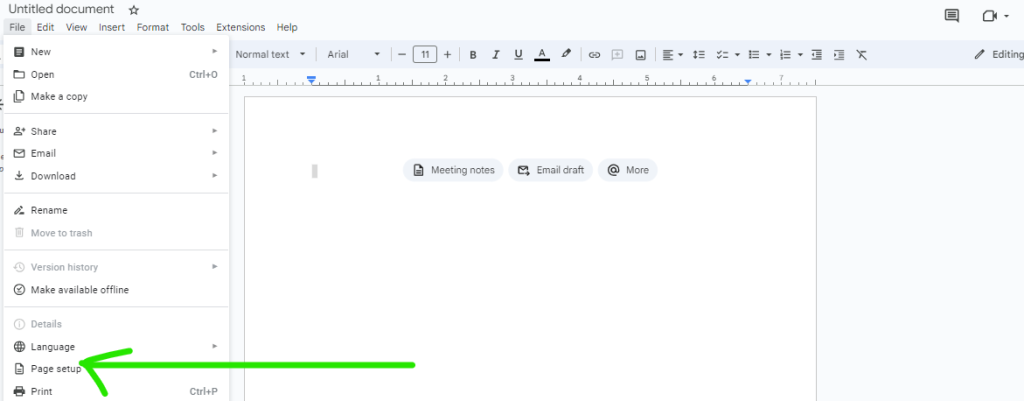
Adjust the page size, orientation, and margins according to your needs.
Insert Headers and Footers:
Go to Insert > Headers & footers > Header (or Footer).
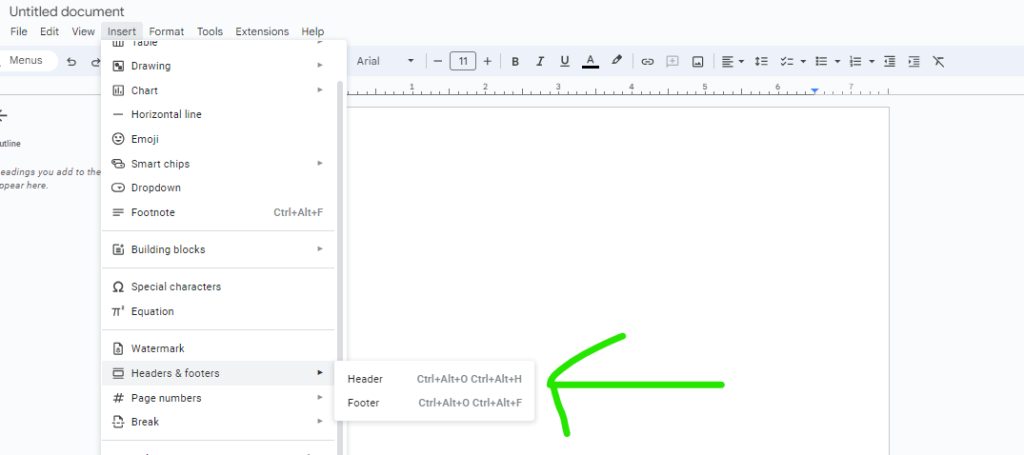
Add your newsletter title, date, and page number if desired.
You can make adjustments to the page orientation, size, and margins here to make sure your newsletter prints properly or displays properly when shared online.
In this step keep an eye on how your information is aligned and spaced within the page structure. A visually balanced and orderly newsletter layout makes the content easier to read and aids in guiding the reader through it. Try with several page arrangement choices until you have the ideal harmony between your design components and content.
Step 4: Design the Layout
Create Columns:
Go to Format > Columns.
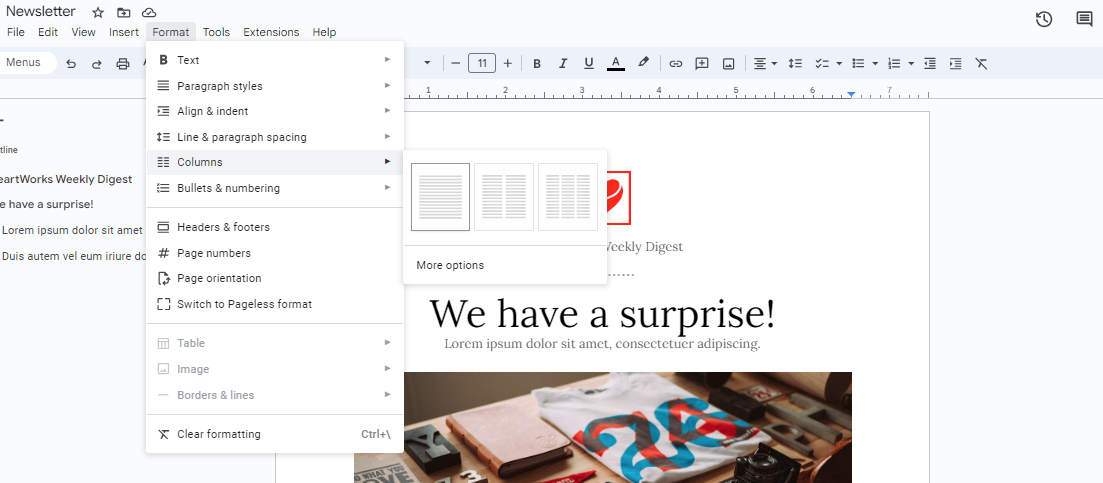
Choose the number of columns you want for your newsletter (typically two or three).
Add Sections:
Use the Insert > Break > Section break (next page or continuous) to create distinct sections for different topics.
Insert Text Boxes and Images:
Use the Insert menu to add text boxes and images.
To insert a text box, you can use Insert > Drawing > + New, then use the text box tool in the drawing panel.
Position and resize images as needed by clicking on the image and using the blue markers.
Use Tables for Structured Layouts:
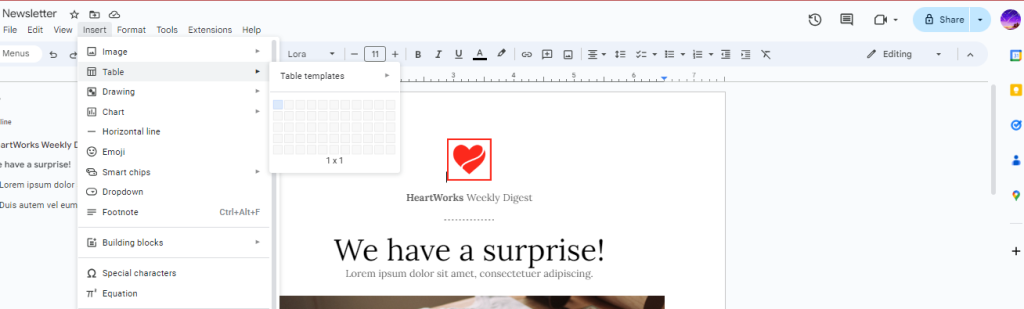
Insert tables to organize content like articles, advertisements, or schedules.
Go to Insert > Table and select the desired number of rows and columns.
Step 5: Style Your Newsletter
Fonts and Colors:
Highlight text and use the toolbar to change fonts, sizes, and colors.
Use consistent font styles for headings, subheadings, and body text.
Headings and Subheadings:
Use Format > Paragraph styles > Headings to format your headings and subheadings.
This helps with organization and readability.
Bullet Points and Numbered Lists:
Use the toolbar buttons for bullet points and numbered lists to make information easy to scan.
Background Colors and Borders:
Use Format > Paragraph styles > Borders and shading to add background colors and borders to sections or text.
Steps 4 and 5 will help you create a visually appealing and interesting newsletter. Try out various combinations to get the ideal appearance for your newsletter. Keep in mind that consistency is important when it comes to branding, so be sure to pick fonts and colors that are suitable for the identity of your company.
Step 6: Add Links and Interactive Elements
Hyperlinks:
Highlight text or an image, then go to Insert > Link to add hyperlinks to web pages or email addresses.
Interactive Elements:
Add clickable elements like buttons by using the Insert > Drawing tool and linking them.
Step 7: Review and Finalize
Proofread:
Check for any spelling or grammatical errors using the built-in spelling and grammar checker.
Edit and review your content before putting the finishing touches on your mail. Check for spelling and grammatical errors, and make sure your information is clear and concise. Once the information is to your satisfaction, check that everything is aligned and visually appealing by going over the layout and formatting.
Collaborate:
Share the document with others for feedback by clicking the Share button in the top-right corner.
To get a new viewpoint on your newsletter, it could also be beneficial to have someone else assess it.
Export:
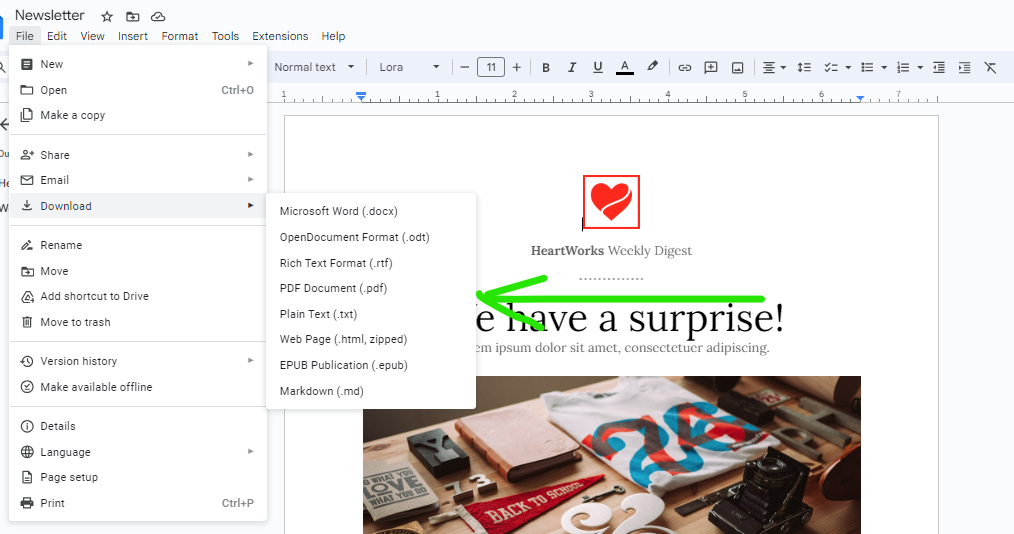
When your newsletter is ready, you can download it as a PDF or another format by going to File > Download and choosing your desired format. If your newsletter has a lot of images and the exported file is too large to email comfortably, it’s worth running it through a tool to compress PDF files before sending it out.
By following these steps, you can create a professional and engaging newsletter using Google Docs. However, you might need to send it out manually as most tools do not accept sending PDF attachments.
If you would like to send it via a platform like ConvertNow, export the email as HTML from Google Docs, then create a campaign in ConvertNow, and add the HTML content into ConvertNow’s email code builder, then proceed to send it. Full steps are available below if you want to create, design and send the newsletter using ConvertNow.
In addition, ConvertNow’s new AI email Composer now helps you build your emails using AI from any email design you like; or from a few words of text, copy and or URL. This eliminates the cumbersome process of starting from scratch on a drag and drop editor. Now you can tell ConvertNow’s AI email composer what you need and it will build it all for you.
Creating and sending a newsletter with Convertnow
Convertnow newsletter tool provides a variety of integrations and email newsletter design options.
Throughout the sections below, I’ve used screenshots from the convertnow email newsletter tool to demonstrate every step.
Step 1: Setting Up Your Account
To create a newsletter with ConvertNow, first sign up for an account. Fortunately, the process is easy, requiring only your name, email address and a password to start. We recommend setting up your two factor authentication right after to ensure that your account has the maximum available security.
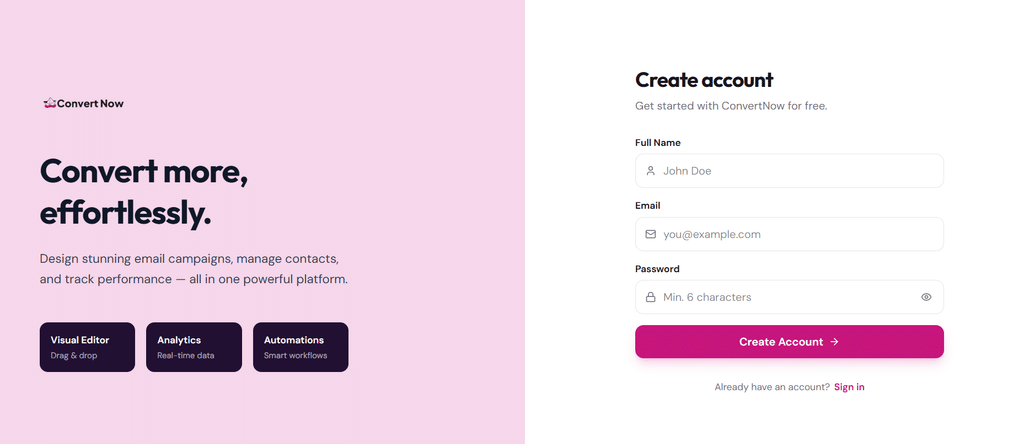
Next, log in, select “Campaigns” from the main menu, and then click “Create Campaign.”
Step 2: Creating a campaign
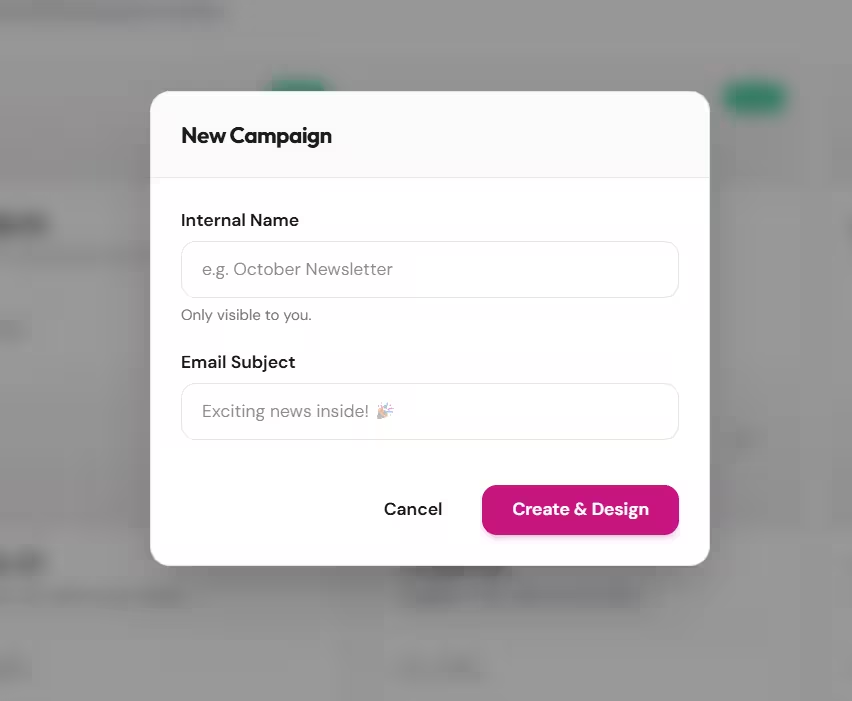
The next step is to build a campaign. Pick your internal name – this is not sent to subscribers. Add your email subject line click “Create & Design”.
Step 3: Build your email content
In this section, you have several options to build your email. You can choose to build the email using our visual drag and drop editor, plain text or html code. All the three options are available at the top using the selector.
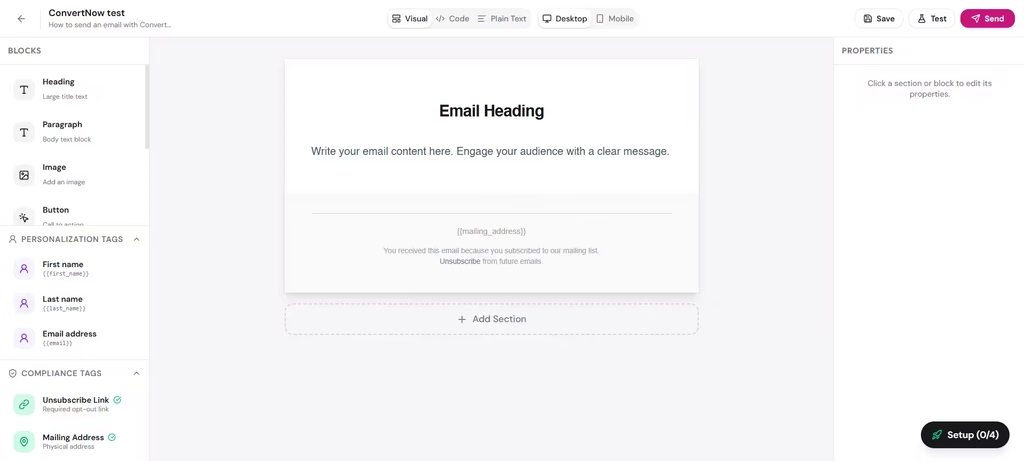
You can also decide to start from our AI email composer. This is the fastest way to go from zero email to nearly done email copy on ConvertNow. You can start from your copy as text, or from a link on your website, or from a template email that you have. With any of that as the base, the ConvertNow’s AI will create your email and fully design it. If you would like to make changes, you can do so in the drag and drop editor once our AI is done.
Step 4: Send the email
You can send a test to any email address to ensure your email is rendering properly the way you’d like. Once it’s ready, click on the “Send” button at the top right, you’ll go through a series of actions that include:
- Setting up your subject line, preview text and selecting the sender email
- Selecting which list of your audience should receive the email
- Picking if you want to send now or schedule for later
- Final step of reviewing that everything is okay
- Sending the campaign
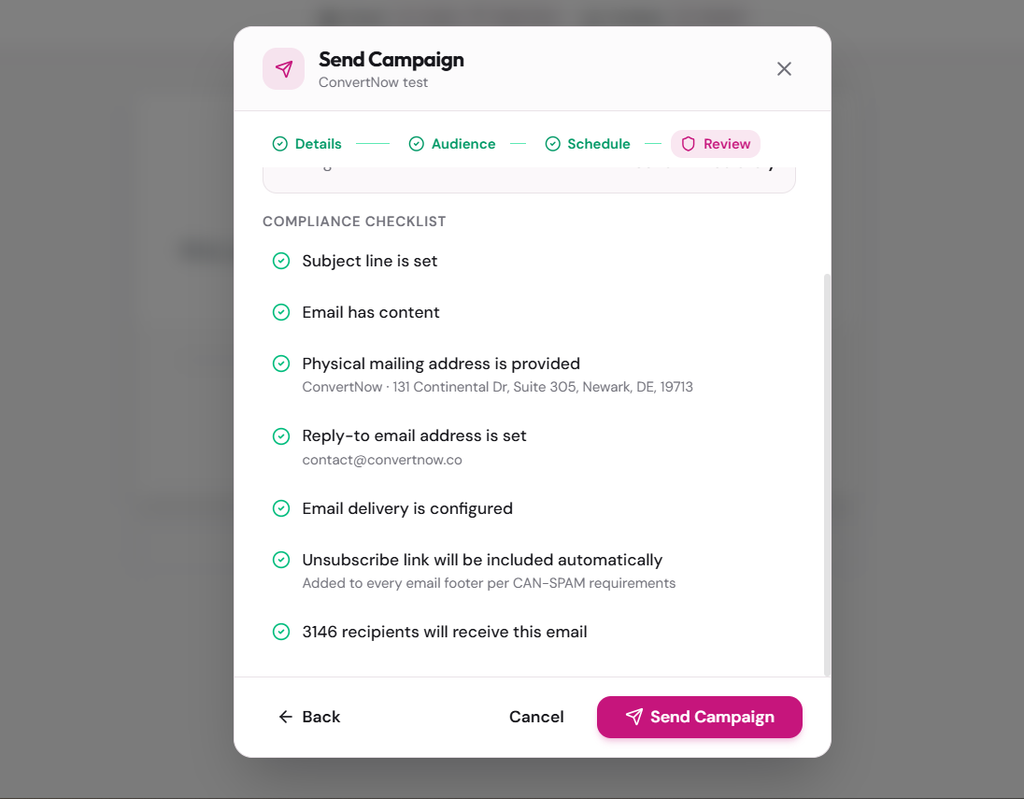
In those 4 steps, you will have completed sending your campaign. It’s definitely much easier than building your newsletter in Google Docs and then deciding how to send it after. On ConvertNow, our free email plan allows you to send up-to 10k emails per month for free, with unlimited contacts accepted in your database. So you can go from zero to sent emails in less than 20 minutes on ConvertNow at no cost at all. If you need more sending volume, we are probably the most affordable email sending solution in the market. Check out our pricing page for more details on the paid plans.